Saturday, July 30, 2011

Homemade Protein Bars

I have always been a health-conscious person, which is fundamentally at odds with my love of all things sweet and buttery. But most days I try to keep things pretty healthy: lots of fruits and veggies, exercising, not going overboard on sweets. However, my attempts to get in shape are always hindered by the fact that I am not a breakfast person. Don't get me wrong, I love breakfast foods, but I tend to eat little to nothing in the mornings, which means I'm starving by lunch. I'm really just not interested in food first thing in the morning--I'm not interested in anything except going back to sleep.

So throughout high school and college--if I ate at all in the morning--I would either eat a protein bar or drink a shake. But the high quality protein shakes and bars are pretty pricey, and lots of them are 200+ calories with sugar in the double digits, and who knows what other chemicals? So I began to look for alternatives, and I happened upon this recipe for homemade protein bars: http://goo.gl/r1fcw. Now, I tinkered with it and made it my own, but the credit for the original recipe goes to Project Swole. 

I wanted to make 2 kinds of bars: a fruit one for breakfast and a chocolate/almond one for an afternoon snack. Here's how they turned out:

Ingredients:
3 1/2 cups Quaker oats
1 1/2 cups dry milk
1 tbsp cinnamon
3/4 cup lite syrup
2 scoops whey protein powder (I used a vanilla one)
1 egg
1 1/4 cup fruit juice (I used a blend including orange, grape, pineapple, and mango)
1 tsp vanilla extract


For fruit bars: 
1 cup dried fruit mix 
For chocolate-nut bars: 
1/4 cup toasted almonds, chopped
half a bar of good quality dark chocolate, chopped

Directions:
1. Preheat oven to 325 degrees. Line a cookie sheet with foil, forming a divide in the center of the foil if you want to make both kinds, or your own versions. Spray the foil with cooking spray.
2. In a large bowl, combine all the ingredients except your dried fruit/nuts/chocolate/what have you. The mix will look fairly wet.
3. Divide the mixture into 2 separate bowls and add in your fixins (here we have chocolate and almond on the left and fruit on the right).
4. Spread the mixes onto the cookie sheet. (See how I have a foil divider in the middle?)
5. Bake for 15-18 minutes, or until golden brown.
6. While they're still warm, cut them into whatever size you prefer. I found that it was easiest to do this by removing the bars from the cookie sheet by lifting the edges of the foil and transferring onto a cutting board. Cut the bars while still on the foil, then carefully flip the foil over and peel it off. This prevents you from having to cut and lift out each bar individually, running the risk of breaking them apart. 
7. Let cool then wrap in cling wrap. You can store these in an airtight container at room temp for 2 weeks.

Just in case you're wondering, the fruit bars have approximately 109 calories, 6g of protein, and 9g of sugar. The dark chocolate/almond ones have 88 calories, 4g of protein, and 8g of sugar. The sugar mostly comes from the syrup and the fruit juice, so if you'd like to make lower-sugar bars, you would have to find alternative ingredients to add the sweet, moist element. The next time I make them I might try something less sugary. 

The way I cut the bars, I ended up with 12 fruit and 10 chocolate/nut. You can make them as big or small as you want, but that will change their calorie count.

Now I have something cheap, delicious, and low-cal for my breakfast and afternoon snack for the next 2 weeks! We'll see if I can drop a couple pounds...
 

Saturday, July 2, 2011

Everybody Loves Pizza

Hey there, everyone...sorry for the long absence. It's been a busy couple of weeks but I have some new adventures to share. Last night, my parents had their big 4th of July celebration, which meant plenty of good food and wine to go around. My dad requested that I make Roman pizza. The story behind pizza at our house is this: last summer, when we got a new grill, we also got a pizza stone to experiment with. The goal was to recreate the delicious paper-thin crust pizzas we'd eaten in Rome the summer before. With lots of experimentation and a few mishaps, we're finally starting to get it down.

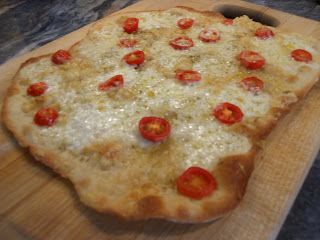
We made two pizzas last night, one classic margherita and one 3-cheese. It was a big hit, and there was a bit of leftover dough so I made a smaller one today for lunch, using the oven instead of the grill, and changing up the ingredients just a little bit. I used fresh minced garlic, herb olive oil, cherry tomatoes, parmesan, fontina, and taleggio cheeses.


All good pizza starts with the dough. Our Roman pizza dough comes from Peter Reinhart, and is fairly simple to make. We originally found the recipe courtesy of this blog: http://flamingobear.com/2009/05/roman-pizza-dough/. You can fudge a little bit with pizza because it isn't as finicky as other breads. Definitely a good dough to start with if you are new to baking.

The tricky parts of making Roman pizza are 1) getting the dough super-thin, and 2) transferring the raw pizza onto the pizza stone. Also important to note is that you can use your pizza stone either in the oven or on the grill. We prefer the grill because it gets a sort of char on the crust that mimics that of an authentic brick oven. But I use the oven just as often, and either way is delicious.

So, to the process:
Once you've followed the dough recipe above, take the dough out 2 hours prior to baking to let it come to room temperature. Flour a clean counter and transfer the dough gently onto it. Then, using a sharp knife or pizza cutter,  divide the dough into 3 or 4 pieces, depending on how big you want your pizzas to be. Keep in mind that the thinner you want your pizza to be, the less dough you need. For a thin crust, one fourth of the dough should do the trick.

Next, shape the dough ball into a round and begin to stretch it into a big circle. You can do this however you like, I use my hands and rolling pin towards the end to get it really thin. I never learned how to toss pizza, but my way works just fine. Also, the thing with homemade pizza is that it doesn't need to be perfectly round.


Once the dough is thin enough, it is time to transfer it to the pizza peel (aka the gigantic pizza spatula thingie). Make sure to first dust the peel with a generous amount of either semolina or cornflour--and I mean generous. This is what helps the pizza slide smoothly onto the stone. I've learned the hard way that you can never have too much semolina on the peel.


Once your peel is dusted and ready to go, gently transfer your dough to the peel and begin adding your toppings.


Baking pizza requires your pizza stone to be very hot. In the oven, 500 degrees usually does the trick. On the grill, 500 to 550 works, but the hotter the better. But since the heat is so high, these suckers cook fast. Once they go in, best not to get distracted.

So once your pizza is dressed and ready for baking, open the oven or grill and gently transfer the pizza onto the stone. This takes a little practice. Place the tip of the peel towards the back of the stone, and give the pizza a little head start with either your fingers (careful, it's hot!) or a spatula, and maybe a little shake, then gently slide the peel out from under the pizza. Easier said than done! But the great thing about pizza like this is that, even if it doesn't turn out pretty, it's always delicious.


Like I said before, these pizzas cook fast, about 5 to 7 minutes depending. It's best to keep an eye on them. Once all the cheese is melted and bubbling, and the edges of the crust are golden brown, it's time to take it out. The good news is, taking the pizza off the stone is a lot easier than putting it on. Just get your peel under the edge and shake the pizza towards you. Then I usually slide the pizza onto a wooden cutting board to slice and serve.


Bellissimo!

Be sure to eat this pizza while it's hot! The thin crust means it cools down quickly, and it doesn't microwave well. Eat it up while it's hot and crispy!

So that's it on the pizza. Stay tuned for chapter two of my bread-making adventures: I'm attempting French country bread this weekend. That's all for now!